Look, I broke my Mac:
Okay, okay … I didn’t really break it. Instead, it was time for an upgrade.
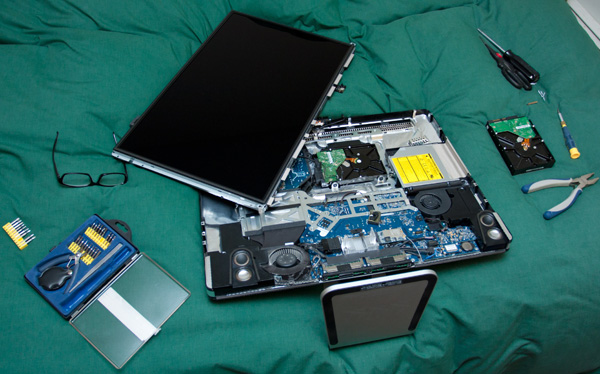
I bought it with a 320GB hard drive, which you can see to the right, just above the pliers. In the guts of the computer, at the top centre, you can see the brand-new 1TB hard drive I just installed. The LCD is still attached because removing the third connection was a little more trouble than it was worth. I had full access to the drive after removing the other two connections and swinging it away as you can see. I really wanted to blow out the fans with some canned air, but I wasn’t going to risk getting the LCD so dusty that I couldn’t clean it.
Dust was a major concern because there’s a piece of glass that covers the LCD, so any dust on the LCD or the inner surface of the glass would be difficult to remove once I reassembled the system. I dosed them both with compressed air and it seems to have worked out just fine. I was nervous when first booting the system because the canned air I bought managed to spray a quantity of propellant on the glass. Yes, I was holding the can upright. It would either evaporate entirely or leave some trace behind. Happily I can see no trace of residue.
I didn’t just tear into the computer, blindly. Goodness, I wouldn’t do that with a device so plainly not designed for user-servicing. I might be a little too eager to open things that I shouldn’t open, but not to this extent! I did it because I had the good fortune to discover an article called Upgrade your iMac 20″ or iMac 24″ aluminum 2007, 2008 & 2009 to 1.5 or 2TB Hard Drive — DIY Guide that described the procedure with lots of photos. It didn’t seem that hard so I decided to give it a try, planning to back out before I got myself into trouble. I know those sound a lot like famous last words, but it turned out that it was less complicated than I expected and it took between 20 and 30 minutes to complete.
The only required prep was to assemble the tools, including some small Torx drivers and a couple of suction cups, and to clone the old drive to the new one. I wasn’t about to reinstall everything so a block-level drive clone was the way to go. I cloned the drive before I did the swap so that after the operation, I could turn it on and everything would work as it should.
Everything is working so I feel that I can call the operation a success!